Showing posts with label Home improvement.... Show all posts

Thursday, December 03, 2015

The Dish cabinet.

One of the things that I like to do is to restore furniture.  Specifically furniture that I will use and that has belonged to someone else in the family.  I've done a dresser, a library table, the Hoosier, and others that aren't coming to mind right now.  This most recent project is exactly like all the rest, it was a piece of furniture that belonged to the family.  I really thought I'd taken a picture of it "before", but I can't find it now.  Maybe I never did take that picture, but always thought I should take it.  That would be completely in character!

Sitting in the garage, ready for its new home!
 This cabinet belonged to Grandma and Grandad Woodruff.  Before the tornado, it sat in the kitchen, right inside the kitchen door, to the right hand side.  It's a solid black walnut cabinet, probably homemade.  There aren't any shippers marks or makers marks anywhere on the piece.  Grandma didn't have a "modern" kitchen, she had this cabinet and the Hoosier and I think the sink had a few cabinets under it.  This cabinet was the home of her dishes.  Silverware went in the drawers.  Under the drawers, she kept those dishes she didn't need as often. Boxes of cereal were kept on top. On the south end of the cabinet (or left side as you look at it), they kept a wire hanger that had been un-twisted.  Then they'd stick all their receipts on that wire.  Sometimes, it was behind the cabinet, but later in the year, it would stick out to the side.

After the tornado, Grandma and Grandad moved to town and left this cabinet in the basement. (Which was covered by a metal roof to protect everything they left at the farm.)  About 3 years ago, I finally convinced Kevin to bring this cabinet home for us to restore.  It sat in the garage until this October when we finally decided to get it restored and to give it to Andy.   So, we washed it and assessed its condition.

We knew there was some termite damage.  Everything stored in the basement suffered in varying degrees with terminate damage.  (The termites were discovered and eradicated during the 80's, after Grandad died.)  So, Kevin looked at the cabinet to decide what he would have to do.  I thought all the termite tracks could simply be filled in with wood putty, but Kev disagreed.  He took the back off, which was a walnut tongue and groove.  It was so brittle that it splintered when he tried to remove it.

One of the shelves was too far gone, so Kev pulled it out and replaced it.  Fortunately, he had an old piece of wood that was exactly the right dimensions.  One other shelf he could simply fill in the few tracks with putty.  One front edge, we just sanded the remaining tracks down until they were stable and left it.  One of the lower cabinet shelves had a knot hole about 3 inches in diameter.  The knot had long ago disappeared.  We left the hole.  We also left the spot where mice had chewed into the bottom corner.  There were huge gouges in the top.  Several deep dings in the sides  One of the sides still showed the saw marks. We left it all for character, and because, well, it is an old, beat up cabinet. It had survived at least 7 children and 20 some grandchildren and a tornado.  It's old and it's a survivor.  We wanted those scars to be a part of its story.

We bought some new tongue and groove car siding and replaced the back with new wood.  The top of the cabinet wasn't centered.  One edge was flush with the side of the cabinet, so we pulled it off and centered it.  We had to replace one of the pieces of glass.  All the hardware was sanded to remove rust, but we didn't remove it from the piece because we were afraid of losing screws or stripping them out and we wanted to retain the original as much as possible.

We wanted to keep the character, but we just didn't think staining and refinishing was the answer.  So, I convinced Kev to let me paint it with chalk paint.
 I'd been wanting to use chalk paint on something, and this became my first project.  Andy wanted it to be black.  I chose Rustoleum new line of chalk paint. The inside is painted in Aged Grey and the outside is called Charcoal.  I wasn't sure how we were going to like it once I had it painted, but then I sanded it and distressed it a bit.  And once we got the top coat on, I really quite liked it.  It looks old and rustic, and yet the paint gives it new life.
We took it over to Andy on Thanksgiving day.  My folks helped us deliver and set it up.  Dad thinks his grandad, (Harvey Woodruff) made it for his Grandma.  I wouldn't be surprised.  It had been built using square nails, finish nails,  and 16 penny nails--in other words, whatever was handy and available.  It had been varnished, or waxed, and stained, but not touched in a very long time, so not much of the original finish was left.  I'm not sure if the latch on the bottom doors is original, as there were tiny nail holes right above this latch that looked like it was for a latch.  But, then again, maybe he started to put the latch there and realized it wasn't centered, so moved it down.

I sure wish someone was around who knew the origins of this piece just so I would know and could pass that history on down with it.  It doesn't really matter though.  I'm  very happy we could save it.  I'm even more happy that one of my kids wanted it.  That Andy wanted this part of his roots means a great deal to me.  He never knew my grandparents.  He never knew the farm as it was when they lived there, and yet he wanted a piece of them.  Hopefully, this piece of them will live on for a very long time.

Friday, October 10, 2014

Siding part 2

Siding is complete!
Not painted yet, but it's up!
Not Caulked yet, but up!

Kim and Bob came out to help us finish the east side.  The four of us work well together.  Kim did most of the cuts, I was the gopher and I was the third ladder person for those high sections. (I did better than I thought!)

 Here's the house looking towards the front.  We're looking Southwest.  If you check out the last post, you can see how much grass has grown in the last 7 years!.  It's fall, so it's not green, but it's not dirt either!
 The East side of the house, showing the rock area.  We installed the big bay window at the top.  Right below that, the long skinny window was where we'd taken out a set of French doors.  We just didn't see the sense of having them with the entry door, and that's where we put in the pellet stove.
Another shot of the front...There's only one door on this end now, the sliding doors.  There used to be another door on this side also.  (The person who built this house must have had a thing for doors!)

We're still debating colors...We looked at shades of brown--similar to cedar.  We looked at grays.  (Kevin then veto'd gray.)  Now we're considering green.  An Olive green?  Grayish green?  We haven't decided yet.

This weekend we hope to get it all caulked and some trim put back up along the roofline.  I'm guessing paint won't come until spring.  We're getting late in the year to think about painting.

It's done, and it looks so nice!  Can't wait to see the difference in our heating bills!

Monday, September 22, 2014

The Siding Project

Kevin and I have been re-siding our house.  It's been an adventure.  In exhausting adventure.  A real work out.  A slow process.  Here's some "Before" pictures.  This first one is WAY before.  Because all that bare dirt?  It's now grass!  And the three windows at the top?  They were replaced by a bay window.  Gosh...I really need to take some updated pictures of our place!


 The "old new door" has been replaced.
The garage doors are staying. Because they were a project from a few years ago.  Still work beautifully.  But that siding?  It's all gone.

 Right now, the house looks like this!

Right now, the North side is the only side with intact siding.  (it was probably the easiest side to do!)

Kev and I have debated for over a year about what kind of siding we wanted.  I really wanted to put up siding that looks like logs.  He vetoed it simply because of the maintenance it requires.  We discussed the merits of vinyl, or cement fiber board.  We discussed if we wanted to stay with the current look of our house, or change it.  We discussed hiring the job out, or doing it ourselves.  Anything you can discuss about siding, we did.

Finally, this year, we decided we couldn't put off the decision forever.  So, we bit the bullet and decided to go with fiber cement board siding.  Why?  Well, a big factor was it's fire resistance.  We live in the country, surrounded by pasture and wheat fields.  Prairie fires move fast.  Cement board is fire resistant.  It is also relatively cheap and very durable.  

We picked the width we thought we liked and bought it.  But there was one issue that stalled us.  We felt like the east side (the walk out basement side) needed something...more.  It was such a huge span of space that we felt it looked...bland.  So we then debated whether to go with a stone facade, or something else.  Whether to go with stone panels, or individual stone blocks or faux stone.  We priced it, and gave up, finding it would cost as much as the actual siding.

But then we walked through our favorite store, Menards, and found a siding display that used stone.  Paving stones.  What a novel idea!  We priced it, and discovered it was MUCH more affordable.  So that's what we did.  We put the stone (above) on the walls stopping three feet above the ground.  It took a while--a long while--to install, but we love it!   (and yes, that's a new front door!)

We intended to start and finish the project over the labor day weekend. Oh, we were so naive.  We had help that first weekend.  But we got to the point you see here.  We discovered the old cedar siding was brittle and just shattered and splintered as we pulled it down, taking forever.  

Our house had never been wrapped, so we wrapped it for a better weather barrier (and to hopefully stop the breeze that blows under my bathroom cabinet.)  After our help went home, Kev's only help was me.

He and I have spent every weekend this month working on the house.  (Well, except one weekend, when he had to work at the hospital.) Yesterday, we finished the West and the South sides.  All we have left is the East side, above the basement level.  It's a side I'm not looking forward to doing.  I can do ladders, I just don't like to!  Hopefully, our help can come back next week and help finish this final side of the house.

So, how good of help am I?  Well, I've gotten better with the nail gun!  Lifting and holding the siding isn't an issue, but carrying 3 to 4 pieces very far very often gets tiring.  And I have this hitch in my hip that really has objected to the activity.  Today, I hurt! I can say, with complete confidence, that I don't ever want to earn my living by installing siding...all the measuring and math to figure where to start each course on each side is frustrating. We've stopped working every night exhausted.  Kev asked if it was because we're getting old, or because it's just simply hard work.  I voted for the hard work.  

But, we're getting it done.  It will look nice (once I pick out a paint color and paint it all.)  It should make our house more energy efficient.  I just hope we finish before the snow flies.


Monday, June 23, 2014

The finished Kitchen

You know us, we don't go very long without remodeling something!  
Miss Kat's High School Graduation is over.  Track season is over.  School is out, which means that I have Friday's off.  Which also meant that I had lots of "free" time to do projects!

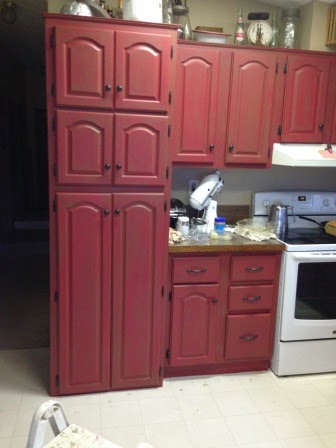
After much thought and discussion, Kevin agreed that I could paint the kitchen cabinets.  Remember back in January when we replaced the counter tops?  I said then that the Oak just didn't match the new tops or the trim that we stained to match the counter tops and new back splash.  We (I) decided to take a chance and paint the cabinets.

I looked at lots of examples of rustic cabinet treatments on Pinterest and the web.  I thought about what I wanted, and decided on a Barn Red with a black glaze.  Except I wasn't sure I wanted to go with black, but thought a dark brown would work.  I asked opinions from lots of friends and family members.  I especially picked the brain of Megan, who had recently painted her cabinets.  She's in the design business and I value her opinion and experience.  She let me know that it was a lot of work, and she was right!


Before pictures:  just as a reminder of where we started!

So, three weeks ago, I started sanding the cabinets.  I removed the doors, removed the hardware, and sanded.

And sanded.
And bought more sandpaper.
And sanded.

Then I stopped by Sherwin Williams for paint.

I got primer (tinted dark grey), and the paint.

Two weekends ago, I painted.  On Friday, I painted the primer.  Two coats.  On Saturday, I painted red.   Two coats.  (actually three on the cabinet doors.)  I painted from 8 in the morning until after 9 p.m. both days.  I held a brush so long that I had blisters!

I also made a mad dash to the paint store for wall paint because we knew we weren't keeping the green, but I hadn't decided on a color.
And on Sunday, I made another mad dash to Dodge to the paint store because I hated the first color I'd picked!  It was too light and just didn't work.

This past Friday, I mixed my glaze color.  And instantly began second guessing my color choice.  It wasn't as dark as I'd envisioned.  But I was NOT making another trip to town to change colors!  And I persevered.  And texted photos to Megan and Bailey for their input.  Both said they liked it, but I wasn't sure...
I finally decided that if I hated it when done, I could put another glaze over this one, but use black.

On Saturday, I took a break and went with Kevin to Wichita.  He was helping some friends move.  I went along and helped unload the truck.  We also stopped by Menards on our way home to get a few items we needed.  Like spray paint.

We'd decided to re-use the existing hardware, but we both really disliked it.  So, we spray painted it Oil-Rubbed Bronze.  

At Menards, we also bought a piece of beadboard to put on the front of the bar (the dining room side.)  I'd painted it, but it was that paper-covered plywood, like what we had on the sides of all of our el-cheapo cabinets.  That large of an area didn't take the paint well and I really hated the look of it--even after I glazed it.  It just looked awful.  We had to do something with it!

On Sunday, we rehung the cabinet doors, and I put on all the hardware.  Kev put up the bead board.  (which necessitated another flying trip to Dodge, because his staple/finish nail gun died.  We bought a new one.  He uses it way too often to be without!)

Here's the finished project (pre clean-up):


The east wall.

The West wall.
 The Dining Room side of the bar with it's new beadboard walls.
 The South wall.

 The North side/kitchen side of the bar.

I still need to paint the dining room.  It's still green.  I'm happy with the beige/tan wall color (it's darker in person than in photos.)  It goes great with my window treatment, so I'm keeping my chicken valances. (Yeah!)  

I do have a small confession.  It's been humid enough that drying time is a wee bit slower than anticipated.  I stacked my doors to bring upstairs, and a couple of them stuck together!  I have to touch up two cabinets.  And I think I will take Megan's advice and get some water based Polyurethane and give everything a coat--including the hardware.  I'm hoping I can apply it without dismantling everything...we'll see.  I also need to find some little pads to put in the corners of the cabinet doors to help with the "bang" upon closing.

And, for some reason, a couple of the big pantry doors don't line up like they did.  Kev tried leveling them, but that caused a gap problem.  So, we have to be a little careful about closing them just right, but I can live with that.  Hopefully this will last us till we can remodel the entire kitchen, in three or four years.

Kev is not a paint guy.  He really likes the beauty of natural wood (if you hadn't figured that out by now!)  He admitted that this looked nice, and looked better than what we had, and that he didn't necessarily have faith in me.  He just KNEW that I'd get started and that something wouldn't work right and we'd be forced to buy new cabinets.  He of little faith :)

I decided that the brown glaze works well.  It brings out the browns in the trim, the back splash and the counter tops.  The black hardware brings out the black in everything...so it does work.  (I shouldn't doubt myself as much as I do either!)

I'd like to say this was a cheap fix, but it wasn't cheap.  I spent $200 in paint and primer.  I guess that's cheaper than a new kitchen, but it was more than I hoped to spend :).  However...I think buying GOOD paint is worth it.  
Right now, I'm ready to retire my brush and get my kitchen back to normal.  I need to finish Kat's scrapbook/album (with graduation stuff.)  I've got a cross stitch project to finish.  (I haven't touched it since April!) I've got flower beds to weed, and hopefully some canning in my future.  

Today, I'm tickled...red...about the new look in the kitchen and am ready for normal.  However...Miss Kat did mention that her bathroom is the only room in the house we haven't touched.  We might have to look into that!

Monday, April 14, 2014

Never ending remodeling.

You'd think we were done with the remodel of Andy's bathroom.
But you'd be wrong.
We thought we were done in that bathroom.  
We were wrong too!

Here's the towel rods we originally installed.  They looked nice, but they kept pulling out of the wall or would fall off the brackets.  These are the kind where you don't have any visible screws, and they hook over brackets that you tighten a screw against the bracket to hold them to the wall.  

Nice in theory.  Not so nice in actual practice.

So, I've been brainstorming, and shopping, looking for something that would stay on the wall and still be "oil rubbed bronze."

I got the idea for the new ones we have by thinking about the stair rail in Mom and Dad's house.  It's simply a galvanized pipe screwed to the wall.  Now, granted, as a pretentious teenager, I thought it was cheap and hokey, and just lived with it.  (It was better once we painted it bright apple green!)  But now, I was thinking how it has been on that wall for almost 100 years and was trying to think of a towel rack that would do as well...Eureka!


 So I presented my idea to Kevin, to make towel racks out of galvanized pipe.  He was skeptical, but I searched Pinterest and found several examples.  I even found some painted black and a couple with a shelf.

I had him hooked on the idea with the shelf.


So on Saturday morning, Kev went to town and came home with all the hardware for new towel racks.
I washed them up--to scrub the protective coating and oil off the metal.  Kevin built his rack.  I spray painted it.  Kev then went out and found a piece of wood, cut it to fit, drilled the holes for the pipe, and we were in business!

I washed the piece of wood, because it was pretty dirty!  Kev spaced his brackets so that two were in studs and he installed those plastic brackets in the other holes.  THIS towel rack isn't going anywhere!

I LOVE it!

(Note, we did use ONE recycled pipe out of some that Kev had at home.  We didn't have any brackets or elbows.  I'm sure we could have found some if we'd gone to the farm, but it was easier to buy new.  But rest assured, I'm thinking of other ways to use some old pipe that's laying around!)

Tuesday, February 18, 2014

Andy's bathroom remodel

When we bought this house, there was one room that was not painted white.  It was this bathroom, the main bath, the guest bath, or as we call it, "Andy's bathroom."  He doesn't live with us anymore, but it will probably always be "Andy's bathroom".
 When we first walked in, it was a little overwhelming, all this purple--even the ceiling was purple!
 But, with daylight streaming in the skylight, it's a nice bright room!  That skylight is the only window in this bathroom, and I really love it.  I'd like to put a skylight in my laundry room too, but that will have to wait until we have to replace the roof.  I would never have picked this color, nor would I ever have painted the ceiling.  It's textured. Not a popcorn ceiling, but with what I call a swirly pattern.  Like it was combed with someone's fingers.  Unfortunately, this bathroom had a crappy tub.  It was a one piece unit--walls and tub all made of fiberglass.  Molded into one piece.  And it never drained well.  And the faucet was crap.  We decided to remove the tub and install a walk in shower.  We've still got 2 bathrooms with 2 tubs, and since this one is used primarily as a shower by guests, we decided to make the change.
 Construction wasn't without some challenges...the vent pipe was under the tub, the water lines came up through the floor instead of in the wall and we had to move the drain 6 inches.  We chose the above shower kit.  It's an Onyx product.  Solid surface.  And it's manufactured here in Kansas.  It also has a lifetime guarantee.  My brother had one installed in his house and he really likes it.  It's easy to clean (vinegar and water) and needs very little maintenance.  Someday, we can even add a bench of we desire.  We also replaced the floor in front of the toilet/shower area.  We found a wood looking tile in barnwood grey.  Was super easy to lay the tile and used very little grout.  (In fact, I have a nice big bucket of grey grout if anyone needs some.  I bought way too much grout!)

Kev left the transition strip brown.  Me, I'd have stained it grey to match the floor.
We even switched out the towel rods and the faucet to oil-rubbed bronze.  (We'll replace the actual sink soon. Someone accidently did something to the drain and it leaks.  He damaged the sink, not the drain pipe.  I just need to pick out a new sink and this bathroom is complete!)

I left it all purple because I really had no idea what other color to paint this room, and the thought of painting the ceiling terrified me!  And, I still like the purple!  It turned into a very nice looking bathroom ready for visitors!

Monday, February 17, 2014

A simple project...

This is my kitchen.   I've always had a love/hate relationship with this kitchen.  I hate the white floor.  (Why would anyone put in a white floor when you live in the country?)  I like the counter space, but I dislike the "cabinets."  They aren't real cabinets.  Well, the upper cabinets are real, but the lower ones are a framework with shelves open from one end to the other.  And the corner cabinet by the stove and the one by the dishwasher are so deep and run back in the corners where you can't retrieve anything, or even see anything.  They are cheap, cheap, cheap.  Functional--to a point, but still cheap.(Please ignore the formica on the floor, and the mess.  And keep reading for an explanation of the mess!)

 And, now ignore the half loaf of bread :)  Concentrate instead on the colors and the formica.  While I have plenty of counter space, I've never been crazy about the tile on the edge of the cabinets and the backsplash.  Just not really our colors. I also don't really like the drawer pulls or the knobs, but that's minor.  About a year ago, the formica above the dishwasher and the corner of the cabinet above started popping lose.  The glue had lost it's stick.  We've looked at new countertops, and new cabinets--upper and lower cabinets.  We've priced it all and we've discussed changing the layout.  We just haven't made the commitment to actually take the leap and DO the remodeling or spend the money!
 Right after Christmas, we found some formica on sale at Menards.  We picked out a pattern we liked and bought it and brought it home.  We also bought some tile for the backsplash and some wood for the front edges of the cabinets.  Total spent?  Right around $100--give or take $25.  We figured that when we finally can do the entire kitchen remodel, we can "afford" to waste $100.  AND, honestly, it will be 3-5 years before I see us doing the entire kitchen, so we'll get our money's worth.

We'd recently been to a home show where a rustic bath and kitchen remodeler had a display.  One of the ways he finished cabinet edges was to put wood trim up and distress it, even distressing the formica at the edge of the cabinet.  Both Kev and I really liked the look, so we decided to attempt it ourselves.

Before starting, we discussed what we were going to do with our bar.  (pictured above.)  The counter is deeper than standard countertops.  It's 36" across.  It's a little low for us, and it tends to become a collector of junk.  Since our stock formica didn't come in 36" width,  (and we didn't want to special order it)  we brainstormed for ideas.  Kev's come up with an idea to make a higher shelf on the back side.  We'll piece in the formica on that side, which will be covered and not readily visible. It will hide some of the junk that shows up, and will be higher, which we'd both enjoy. I'm still a wee bit skeptical, but he's pulled off other ideas, so I will just have faith in him!

And, so on Saturday, Kev was restless, and decided to just tear into the kitchen.

We tore off the bar formica first.  Let me tell you, formica is sharp.  I have quite a few cuts on my hands!  We discovered that using my iron loosened up the glue which made it faster and easier to rip the formica off the countertop.  (Didn't do a lot for my iron, it's all scratched now!)  Then Kev cut the formica, and started building his shelf.  He did all the cutting, and I brushed on the contact cement.

Now, I've never done formica myself before. I've just watched some guys at work put in a new counter top on my circulation desk years ago.  I knew they used a lot of shims as they were fitting the formica, because they told me, once those two pieces touched, they were stuck.  There's no repositioning of the formica.  When it's down, it's down.

I asked Kev what he was going to use for shims.  Nothing.  I asked if he's done formica work before.  He say's he has. I suggested we get come cardboard for shims, and he finally did, but we had 3 pieces only and well, long story short, we ruined our formica.  Yep, it stuck where we didn't want to, and we tore the heck out of it trying to get it un-stuck!

So Kev said a few not-so-nice words and had a little temper-tantrum and we moved on to the two smaller counter tops.
They went down easy peasy.  He applied the trim, and I put up the tile backsplash.  (It's a wood grain 6" x 24" tile. Like floor tiles made to look like wood. Very rustic looking and probably very unique.)   In the photo above, he's distressing the wood trim.  I've stained the trim on the end he's not working with.  It looks nice.  BUT...it's so much darker that we've decided we will need to strip and stain all the cabinets.  Which might be another issue, because the side panels of the cabinets, and the front of the bar is 1/8" cheap plastic looking wood veneer.  I'm going to try to sand and stain it, but if it won't take the stain, we'll move on to plan B.  The upper cabinets should take the stain.  SHOULD...  Who knows, we might have to replace everything before we're finished.

Miss Kat and I are going to Wichita this coming weekend to get a bridesmaid dress for her, so I'll stop by and pick up another piece of Jamocha Granite Laminate for the bar. We need to do it and the long counter top where the sink is. (the first photo.)  I already know I will need to paint again.  I like the green--even if it is much brighter than I'd planned.  It's not really the neon that it looks above!  New paint color will probably be in the yellow/tan scheme.  I also joked with Kev that the countertops would look much nicer with black appliances instead of the white.  But we are NOT switching them out just for cosmetic purposes!

Really, replacing the countertops moved quickly--we'd probably have gotten most of it done if we hadn't ruined that ONE piece.  But...live and learn!  We'll get it.  We always do!  And it will look nice.  Promise.

Monday, March 04, 2013

Kat's room

  Two years ago, when Andy moved out, Miss Kat moved into his former bedroom.  We painted one wall gray with a metallic glaze over the gray and the rest of the room was bright turquoise/aqua blue.  We bought Miss Kat a duvet cover that was zebra striped.  Unfortunately, the room decor just never clicked with either of us.  Kat hated the duvet cover and we spent more time fighting with the darn thing than it was worth.  

So back in October or November of 2012 (you know 3 or 4 months ago), Kat found a new bedding she liked and we bought it.  And, then it sat in the box it came in because we weren't sure what to do with her room.

It sat there until the weekend of Miss Kat's 17th birthday.  For her birthday, I had asked my cousin, Megan, if she'd come paint and do something "special" for Kat's room. (Megan technically is a cousin by marriage, but the heck with that!)

Megan happens to be a professional painter/decorator and is so creative and un-afraid to try anything!  We discussed colors and finishes and special touches that Megan has done on other projects.  And came up with a plan for Kat's room.  THIS is the result:

Kat picked out a soft yellow that matched the pillows that came with the bedding.  We decided to use a flat paint for the yellow.  It's bright enough that we decided we didn't need any extra shine. The gray wall we'd painted two years ago still worked, so we left it, but "jazzed it up some with the flowers Megan hand painted on the walls.  Plus, the sheen on the gray balanced the yellow.  The gray flowers aren't metallic, but are a nice and soft gray.

The second picture is a magnetic wall.  Miss Kat loves to have photos and pictures and lots of paper stuff on her walls.  So a magnetic wall was a perfect idea.  (You can see a small magnet on the right side, above the light switch.  It really does work!)  We bought Rustoleum's magnetic primer, and then painted over it with the yellow.  Like the "WE"?  Megan bought the primer because I couldn't find any in Dodge.  And, Megan did all the work.  I "supervised."  Which means I sat on Kat's bed and talked Megan's ear off!

Since we were trying to get this project finished between the two snowstorms, Megan came down on Saturday and went back home on Sunday.  She had the room painted on Saturday and we were waiting on the primer to dry.  So, around midnight on Saturday, we went to bed.  I got up around 7:30 Sunday morning and went down to see if Megan had gotten started again.  I walked in Kat's room, and found Megan putting the finishing touches on!  She'd woken up at 4:30 a.m. and decided to get to work.  I can't help but wonder if maybe she worked at that ungodly hour just to avoid my "help!"

Miss Kat loves her new "adult" room.  It's been a week, and her room is still clean!  AND, she's been making the bed!

I told Kat that this was the very last room remodel/repainting job I was doing for her.  This room will last until she takes that big step into adulthood...which is too soon.

(But the bedding stays with me!)

Friday, December 14, 2012

The NEW project

Remember when I said, "stay tuned" at the conclusion of the last post?  Well, it's time to change the channel.
My basement is complete.  Kevin won the bet.  Last Sunday, my living room looked like the above picture.  By the end the evening, it looked like this:

Notice the mantel is missing.  The fireplace trim is missing.  The wood that you see we discovered was simply a vinyl veneer adhered to sheet-rock.  What you can't really see is the wire mesh that now covers the sheet-rock.  If you look closely, you can see some stone laying in front of the fireplace.

That pointy piece of wood to the right side?  That will be a shelf.  Kevin found this photo below online:

And this is his goal for our fireplace. It's beautiful, and I like it.  However, I'm hosting Christmas on the 23rd.  I want this project FINISHED by the 23rd. I want my house "normal" by Christmas!

Our project will be amended, because our fireplace sits on a slanted wall in the corner and we'll use pine instead of oak.  But Kev insists that he'll be finished by the 23rd.  He's the only one in our house who thinks he can have it finished by the 23rd, and he's rather indignant that  none of us think he can get it done in 14 days.  

I'm annoyed by the whole project.  Why?  Because before we had the carpet laid, I asked him if he wanted to take down the fireplace mantle so the carpet would be all nice and flush and even.  "Nope" was his response, because he wasn't going to do anything else to the house.
That lasted 4 days.
And now my living room is tore up.  Again...


Friday, October 07, 2011

The living room...before...

The stair project is presently stalled.

Boy, do I know how things work at my house, don't I! 

Kev found someone local who owns a sawmill.  This person also thinks they have enough pine around to cut treads for us.  However, it's been 2 weeks, and we haven't heard from him, and we won't for another week.  He'll get back to us after next week...  Which is fine. 

I suppose.

Kev and I did run to Hutch last weekend to visit our closest Lowe's store (a two hour drive.)  We went to buy a curtain rod for the bay window.  We also window shopped for "stair items" and kitchen ideas and tile...remember, Hardware/Home Improvement stores are one of my favorite places to shop!

We got some ideas, but...like normal...this project is started, but not progressing...

And...I thought that maybe I should post some photos of the "before." Or should that be photos of the "during?"

 This is the current stair layout.  The wall they follow is the center of the house.  (Our house is a modular, so this wall is a supporting wall.)  So, in essence, Kev wants to remove that half wall which would move the couch back to the supporting wall.
 Just a view of the fireplace.  Note how nice and clean everything is...Oh, but we've also discussed replacing the fireplace surround and rock this entire angled wall of the fireplace.  Our house is just chock full of angled walls, like this one.  (And, doesn't everyone take pictures of what is on TV?)  But, you can see that there's not much space between the couch and the outside wall (that's the wall with the DVD player and the corner of the bay window.)  It measures approximately 5' 6" across there.  So, it's tight.  And that's the space that Kev wants to open up with this project.  He wants to be able to lay on the floor, in front of the fireplace and stretch out.  That is what  started this entire process.
 I took this view while sitting on the window seat of the bay windows.  Just to show how close everything is...and how dirty my couch is!  sigh...
Now this is the corner where the new stairs will be.  This is the main angled wall--the outside wall.  The door will be gone.  We'll have to take it out.  Which is fine, we never use it.   But, that means new sheetrock, and painting and flooring and...well, you know.  The stairs will be where this couch is.  Which also happens to be my favorite spot to sit and stitch...  (Can you tell which couch is used the most?  Yeah...me too.)

So, this is what my living room--upstairs looks like now...stay tuned for the next episode of...The Stair saga...

Friday, September 30, 2011

The Stair Saga

 Let me preface this post by stating loudly and clearly...

I love my husband.

I really do.  But once in a while he gets these wild hairs...and these wild hair ideas...schemes...whatever they are...drive me up the wall.

And this particular wild hair, he's had since we moved into this house. 

He wants to move our staircase.

And he's "started". 

Without a plan, without an idea of the final look of the plan.  And without my support.
This is what my basement looks like...it's all tore up with a partial project "in the works."  This is the wall that Kev wants to put the stairs on.  It slants.  Our house has a...peak? in the center of it.  Both walls angle from that peak.  Kinda like the point of a pencil.  And Kev wants to move the stairs to this wall.  See the stick sticking up in the middle of the picture?  Yeah...that's where the stairs will go...and that wooden monstrosity...that's the landing and then the stairs will turn and be a U shape, with 3 stairs coming to the floor.
 Here's a different picture of the "landing".  It takes up a HUGE amount of floorspace and I'm not convinced that it will ever look nice...
And another view. 

Now, Kev has been observant enough to pick up on my reservations.  he knows I'm not real supportive or understanding about this project...Cause, he'll take at least 7 years to finish it...and it will mean more work...like cutting another hole in the main level floor...and it will mean covering up the old hole and putting in floor joists and re-doing the basement ceiling and the flooring and some electric work and new carpet or something upstairs and relocate lights and...get my drift?  And I know from experience that "little" "easy" projects somehow never quite get finished.

However, I will give him some credit.  He's changed his mind on some of  his plans.  He's not going to have a closed staircase.  Instead, we're going to have open treads.  Chunky pine treads.  Because we like the rustic look, and I absolutely hate sweeping stairs with carpet and stairs with risers which seem to collect dirt and dog hair.  Open stairs will be much easier to clean.  And we've compromised on the balusters and the hand rail and even the monstrosity sitting in the basement right now that Kev calls the "landing."

So, we're compromising.  He's giving me some say in how I want this...thing to look.  And I'm letting him build this...thing.

Stay tuned for the continuing saga of "The Stair Project."

Wednesday, August 24, 2011

Doors

I was gently reminded that I haven't blogged for almost a month. I say "gently" reminded, but it really was a not-so-subtle comment about the lack of posts on my part from my Mother. I think my MIL has also made a slightly more subtle comment about the same thing...

You've got to appease the senior women in your life...so...here we go :)

There's a new Menard's store that recently opened in Wichita. And, since Kev and I are "Home Improvement Store Junkies," we just had to check it out. And we had so much fun! We decided that Menard's is our new favorite Home Improvement store. We found so many things we liked there...it's a dangerous place.

So dangerous that we walked out with new laminate flooring, a new front door, and we ordered new garage doors.

Kev installed them himself.

One thing that we didn't do was order garage doors with a window. That would have been an additional $300 per door and we're cheap. While we'd both love having natural light in the garage...we just couldn't make ourselves pay that much more--especially after dropping a bundle on the flooring and the new front door.


The front door had to be painted. We could have forked out more money and gotten one pre-painted, but, like I said...we're cheap. I am happy with the door, but the installation wasn't as easy or straight forward as I hoped it would be. Kev was a wee bit crabby by the time he got the door installed and level, plumb and working.


The flooring is now residing in the garage, awaiting a time when we rip out the basement carpet and lay it. Kev says that project will wait until after he moves the stairs...so I'm guessing we'll wind up using the flooring somewhere else, cause I am not convinced that he will ever move the stairs...and I'm not sure I want him to move the stairs cause he has a tendency to n.e.v.e.r finish a "big" project.


So the flooring might wait a while. But, the new doors are great. The garage door's seal--making the garage toad and snake proof. (Yes, we've hosted both.) AND, the electric garage door works! It had stopped lifting the old crappy doors a couple of years ago. And it's so much quieter--something Miss Kat will appreciate this winter when we leave at 5 a.m. every morning.


Isn't it amazing how something so simple as new doors makes life just a little bit nicer...


Friday, March 25, 2011

Sage Green

I've always been very good at putting colors together. Such as paint colors. Over the many years that I've decorated various houses and painted rooms, I've been happy with just about everything...until this house. I have always wanted a room that was painted a pretty sage green. I attempted a nice sage-y color for my kitchen, but it's much brighter than sage. But, I liked the color, so left it.

Last year, I painted our room another "sage-y" color...and hated it. In this photo below, it looks pretty pastel and soft, but in reality, it was almost florescent. I kid you not, that room could glow in the dark. Here's another view--it's a little darker looking on this wall but isn't sage and isn't a soothing color at all.

I re-painted our bedroom last week. This time, I chose Glidden's Olive Green. I liked it, Kevin liked it too, so it was a winner. And I love it. It's much darker, but warm and very soothing.


It goes well with our furniture and our bedding. I'm much happier, and... I think I'm over Sage green.